Posts

Showing posts with the label cyanotype

Summing Up What Sort of Photography I Do!
Image
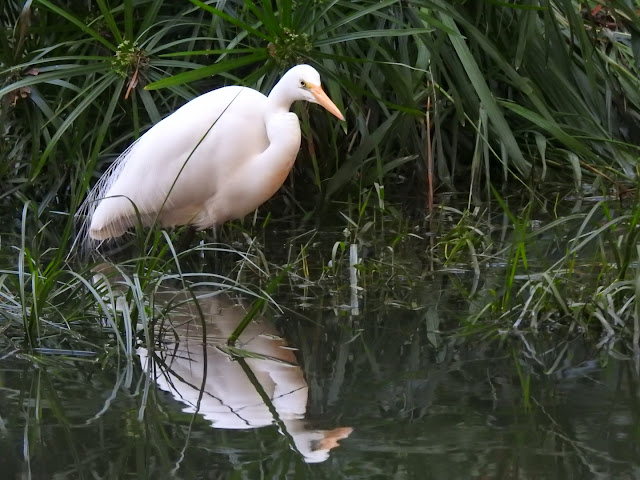
 Folks may have noticed that very little of my photography these days is "normal".  I do still take conventional photos with a fairly ordinary digital camera, but that is mostly my nature photography, and I do not often talk about that.  Great Egret - Herdsman Lake, June 2023. Nikon P900 I also do some astrophotography, up until recently using my mobile phone,  Milky Way, Pixel 6a, Guilderton, June 2022. but more recently with a Dwarf II 'smart telescope'.  Cat's Paw Nebula, Doubleview, June 2023, 98 x 15s frames, stacked in camera. These are not so much telescopes as dedicated astrophotography rigs controlled via a mobile app, and the results speak for themselves. They can align and stack multiple frames all by themselves, and compensate for significant levels of light pollution.  At the other extreme, I also experiment with in-camera cyanotype photography, using an 1830s era chemistry that is best known for making blueprints!  Mandurah Canal House, D...
In-camera Cyanotype exposure calculator

 Ilford/Harman do a wonderful little print-at-home dial calculator for pinhole cameras - but it also covers the range of f/ stops for more conventional cameras.  After some playing around, I have found that it can be adapted to cyanotype as well. 1/ On the ISO (middle) disk, locate the ISO .375 entry. Directly opposite it, write in "Cyanotype". 2/ On the Lighting/Shutter disk (the largest, bottom disk), write in "UV12" between the "->" and the full sun. Then "UV6" between the sun and the "19", and "UV3" between the 19 and the clouded sun.UV 15, for folks in places like Perth or Broome, roughly lines up with the ">" itself. That's it! At UV12, and f/1, an exposure time of 30 minutes is given as the result, which is just about spot on for a properly exposed image after washing. The same lens at UV6 gives a 1 hour exposure - which is correct, given the UV Level scale is linear.  Have fun!

From solargraph to cyanotype

Image
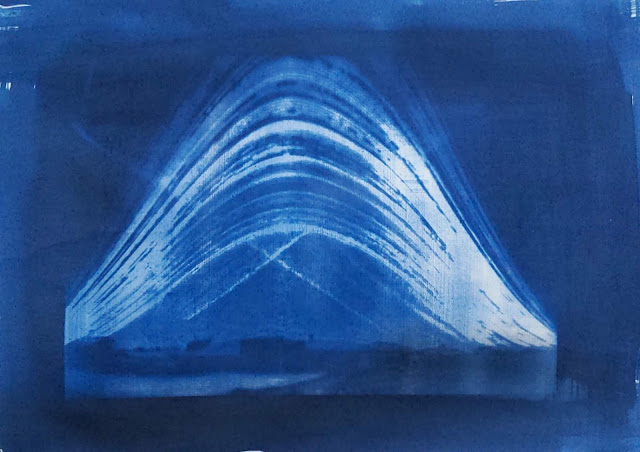
 I usually use cyanotype as an in-camera negative. This is a slow process - each exposure is a couple of hours at least.  I also shoot solargraphs. This is also a slow process, with exposures measured in days or months. Or even years.  As you all saw, a few days ago I brought in one of my six month solargraphs. The resulting image was dramatic enough, that I thought it would make a good cyanotype contact print. This is a very fast process by comparison. Exposure time in Perth in mid-summer is around 4-5 minutes.  Here is the result. I think I will do another print, this time on a tee-shirt!

Scarborough Beach Amphitheatre - Cyanograph vs digital

Image
Scarborough Beach Amphitheatre, 16:15, 45 minute exposure, 45mm f/1.2 VR lens on A7 paper. Processed in Snapseed. The same scene shot with a 20mm APS lens... Æ’/16 , 1/5s,  20 mm , ISO100 Samsung NX300 I find the cyanograph distinctly intriguing - if you are familiar with the scene, you can recognise most of  elements, but even without that familiarity there are some that can be identified. It is also interesting to note that the hessian sack curtain in front of the DJ is effectively invisible in UV!

This Experiment Failed

Image
(End credits, Excel Saga) Yes, today I have a very sad tale to share in my cyanography experiments. You remember last time, I shared this: Well, I have experimented further with inkjet photo paper, and made some very unpleasant discoveries along the way. The first is the streaking - without using a non-contact application method, I am not going to avoid it. The gel surface is just too fragile. So if I want to persist with this, it will be out with the air-brush. I somehow doubt I am going to find spray-cans of cyanotype sensitiser, after all.  The second is in washing. Because there is no cellulose for the Prussian Blue to bond with, the washing inevitably destroys the image, meaning that you cannot preserve the image long-term. This also means that you end up including the un-exposed chemicals in the scan, which adds considerable grain and loss of contrast - especially in the high-tones of the inverted image.  This second issue is essentially insoluble, which is a pity, as i...

More adventures in cyanography

Image
I continue to play with in-camera cyanotype imaging. My latest experiments have involved using inkjet photo paper as a substrate, and in particular in using it as a cyanotype film roll in a medium format TLR. The results have been rather pleasing.  GoSun Fusion. f2.8 90 minutes. SooC. GoSun Fusion. F2.8 90 minutes post-processed. This first one shows just how much detail you can get out of the process - and also the hazards of using a brush to apply the solution to a high-gloss paper. Nevertheless, I think the result is rather effective, and reinforces the juxtaposition of the very old technique with the ultra-modern subject. Garden, SooC f2.8 90 minutes Garden, post-processed. F2.8 90 minutes. In this case the brush streaks are even more obvious, as are a number of blemishes in the coating. When coating non-gelled surfaces, a bush is OK, and a glass spreading rod even better, but neither work particularly well with a high-gloss gel paper. That said, again, the result is intriguing...

Another thing I have learnt while shooting cyanotype.

Image
 Here is a scene I shot this afternoon: Here is the same scene as a cyanotype (reflected, unwashed, and still a negative): One thing really stands out for me - and that is how little the grass reflects UV. Here is a crop of the two images overlaid and scaled. There are some inconsistencies, due to the differing characteristics of the lenses, but you can see how little the unshaded grass is exposed. And the shaded grass is almost completely unexposed.  And, indeed, checking the research, I find that one of the lowest natural UV albedos is from grass, at 0.02. ( https://www.tandfonline.com/doi/pdf/10.3846/1648-6897.2008.16.83-88 ) So my little hypothesis appears to have been borne out by independent research, and a source of other information about things I cannot see when taking the cyanographs, which will help me plan future exposures.  

Photography Scavenger Hunt Round 30 Behind The Scenes

Image
There is a tradition amongst the members of The Photography Scavenger Hunt of showing how  their various clever images came to be. Normally this is a "Here is how I made this particularly clever shot" sort of thing. Not this one. This is about the whole series of images. And I'm not actually going to show any of the ones I used.  Why? Because I'd like to think that I have been especially clever this round, even if I did not submit all ten images. And because it is so cool! First up, I have used a bunch of cameras. No big surprise there, lots of people do. But this is one of them. Mk1 Camera. There are a couple of special things about this camera. Firstly is that I built it myself. The second is that it has no shutter.  "Wait!", I hear you interject, "If it has no shutter, how do you control the exposure?" The answer lays in the the other side of the equation. What it is that I am shooting onto. Because it is not photographic film. Or even photograp...

Cyanotype In-Camera Imaging - Part 3 - Final Thoughts

Image
38mm f/1.5 120 minutes. Back Garden.                                        There are two things that are very attractive to me about shooting in-camera images with cyanotype. One is that it is cheap, very cheap. No dark room, no expensive and troublesome to dispose of chemicals, no film - just the solutions and paper. The other is the curious juxtaposition of almost instant availability of the image afterwards against the long period of shooting.  This is one of the most rewarding aspects of the technique. You have almost instant gratification upon recovering the negative, combined with the forced patience required in setting and taking the shot. Added to that is an amount of uncertainty about exactly how the shot will turn out - because we cannot see exactly how much UV is reflecting off the surfaces being imaged. This makes the process very exciting. Not to mention the sometimes ...

Cyanotype In-Camera Imaging - Part 2

Image
In Part 1, I went over some history, and the things you have to think about differently when working with in-camera cyanotype. In this part, I will provide a simple design and instructions on how to build it.  The design is based around the lens of a Google Cardboard VR headset. These are cheap and easy to obtain. There are two common versions - one is roughly f/1.5 and the other about f/1.2, and they also have differing diameters. As this also results in different focal lengths, there needs to be a couple of changes to support both versions. Further, the design is flexible enough that almost any lightweight lens can be used with some modifications to the dimensions.  Materials Black Gaffa Tape. Not duct tape, gaffa. It makes a difference. Clear packing tape or good-quality sellotape. 2 A4 sheets of dark (not black) 210-250gsm card 1 25mm diameter/38mm (f/1.5) or 37mm diameter/45mm (f/1.2) lens (or similar, see below) 1 small coin or metal washer An A7 piece of baking parchme...

Cyanotype In-Camera Imaging - Part 1

Image
Back in October last year, I picked up some "Solarprint" paper from an educational supply house that was having a sale. For some weeks I thought about what to do with it, and eventually decided that the usual path of making contact prints or photograms with it was a bit too dull, and that I would build a camera and take photos with it.  Now I am by no means the first person to do this - although the idea of producing cyanotype camera negatives is surprisingly recent. As far as I can tell, the first person to do it was photographer,  John Beaver, in 1999 - over 150 years after the development of the chemistry ! More recently, blogger Nag on the Lake published a how-to for cardboard cameras in 2019. Meanwhile, Ray Christopher has been experimenting with using cyanotype paper as a medium-format negative. The cyanotype process chemistry is rather unusual in that is not particularly sensitive to visible light. It is most sensitive to UVA down to the visible spectrum. One of the s...